Network Audio Player / ST-C700D
Return all settings to the factory defaults
When the following situations occur, reset the memory:
- There is no response when buttons are pressed.
- You want to clear and reset the memory contents.
GENERAL QUESTIONS
The unit does not work.
Operations are not done properly.
- One of the unit's safety devices, etc. may have been activated.
- Lower the power switch lever of this unit to the [OFF] position.
Alternatively, disconnect the AC mains lead, wait for at least 3 minutes, then reconnect it. - Raise the power switch lever of this unit to the [
 ] position. If the unit still cannot be operated, consult the dealer.
A "humming" sound can be heard during playback.
- An AC mains lead or fluorescent light is near the cables. Keep other appliances and cords away from the cables of this unit.
No sound.
- Check the volume of the connected device (amplifier, etc.).
- Check to see if the cable connections to the input and output terminals are incorrect. If this is the case, turn off this unit and reconnect the cables correctly.
- Check to see if the correct input source is selected.
- Insert the plugs of the cables to be connected all the way in.
- When "Digital Output" and "Analog Output" are set to "Off", no sound will be output. Change the setting of the output terminal to be used to "On".
- Playback of multi-channel content is not supported.
The sound is interrupted.
- Depending on your environment, the audio may be interrupted during playback. Check the operating instructions of the connected device and the connection to the device.
Playback does not start.
- Depending on your environment or connected devices, it may take some time.
The system control function is not working.
About Technics devices supporting system control function, click here.
What Technics devices support system control function?
- You can operate this unit and Technics devices supporting system control function simultaneously with ease on the remote control.
- About Technics devices supporting system control function, click here.
The unit turns off automatically.
- Is the auto off function turned on?
To cancel this function
- Press [NWP].
- Press [HOME].
- Press [
 ][
][  ] repeatedly to select "SETUP" and then press [OK].
 - Press [ ][ ] repeatedly to select "AUTO OFF" and then press [OK].
- Press [ ][ ] to select "Off" and then press [OK].
- If the SU-C700 is connected to this unit via the system control function, this unit may automatically enter standby mode when the SU-C700 enters standby mode.
The settings are reset to the factory defaults.
- Updating the firmware may reset the settings.
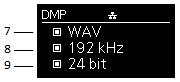
Please tell me the contents displaying on the main unit's display during playback.
- In case of input source is DMP, DMR, AirPlay, Spotify or USB, press [INFO] button to display the track, artist, and album names, file type, sampling frequency, and other information.
- Screen images may differ depending on the firmware version of the main unit. For the update information, refer to the following website.
www.technics.com/support/firmware/
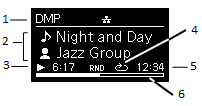
- Input Source
DMP : Digital Media Player
DMR : Digital Media Renderer
AirPlay : AirPlay
Spotify : Spotify
USB : USB device/USB flash drive - The track, artist, and album names
 : Track name
 : Artist name
 : Album name
 - Playback status and Elapsed time
 : Play, Pause, Search (These icons may be not visible depending on Input Source.)
 : Elapsed time
 - Random repeat or Repeat playback (for DMP and USB)
 : All tracks in a folder are repeated randomly.
 : Only plays the selected track.
 : All tracks in a folder are repeated.
 - Playback time or remain time
 : Playback time
 : Remain time
 - Playback Progress Indication
 For the MQA information, refer to the section "MQA".(⇒ below)
- File format (except AirPlay, Spotify)
- Sampling frequency
- Number of quantisation bits (except MP3, AAC, WMA, DSD)
AirPlay/DLNA
Cannot connect to the network.
- Confirm the network connection and settings.
Cannot connect to the unit.
- Make sure that the multicast function on the wireless router is enabled.
- Make sure that the device and the unit are connected to the same network.
- Reconnect the compatible device to the network and then connect to this unit again.
- Turn this unit off and on, and then connect to this unit again.
Playback does not start.
The sound is interrupted.
- Simultaneous use with other 2.4 GHz devices, such as microwaves, cordless telephones, etc., may result in connection interruptions.
Increase the distance between the wireless router and these devices. - If several wireless devices are simultaneously using the same wireless network as this unit, try turning off the other devices or reducing their wireless network usage.
- Depending on the network condition, playback may not be done properly.
- Depending on the internet environment or the network congestion, sound may be interrupted or it may take time for playback to start.
- If the playback stops, check the playback status on the device.
Cannot find music files stored on the PC.
- When you play back music files over a network, those that are not registered to its network server are not displayed. For details, refer to the operating instructions for your server.
Cannot display the information properly.
- Track names, etc. may not be displayed properly.
NAS
Playback does not start.
- Please confirm the update information of NAS.
- When transcode setting is available, please try to select other settings.
Spotify
Playback does not start.
The sound is interrupted.
- Updating the firmware to the latest version. It may be solved.
- Depending on the network condition, playback may not be done properly.
- Depending on the internet environment or the network congestion, sound may be interrupted or it may take time for playback to start.
- The network service may be suspended or be otherwise unavailable without notice.
Cannot display the information properly.
- Track names, album names, etc. which are managed by Spotify, may not be displayed properly depending on the broadcasting information.
- Depending on the internet environment or the network congestion, the information may not be displayed or it may take time to be displayed.
"Operate via App" message appears, and Spotify cannot be played.
- Operate via Technics Music App.
iPhone/iPad/iPod
Cannot operate.
- Select "USB" as the input source.
- Check that the iPhone/iPad/iPod is connected properly.
- Connect the iPhone/iPad/iPod again or try to restart the iPhone/iPad/iPod.
- The battery of the iPhone/iPad/iPod is depleted. Charge the iPhone/iPad/iPod, and then operate again.
iPhone/iPad/iPod does not charge.
- Make sure the unit is turned on when you start charging.
– When charging an iPhone/iPad/iPod whose battery is depleted, do not turn this unit to standby mode until the iPhone/iPad/iPod becomes operational.
USB
The USB drive or its contents cannot be read.
- Updating the firmware to the latest version. It may be solved.
- The USB drive format or its contents is/are not compatible with the unit.
No response when [  /
/  ] is pressed.
- Disconnect the USB device and then reconnect it. Alternatively, turn the unit off and on again.
Slow operation of the USB flash drive.
- Large file size or high memory USB flash drive takes longer time to read.
Cannot display the information properly.
- Track names, etc. may not be displayed properly.
PC
The PC does not recognise this unit.
- Check your operating environment.
- Restart the PC, turn off and on this unit, and then reconnect the USB cable.
- Use another USB port of the connected PC.
- Install the dedicated USB driver if using a PC with Windows.
Cannot play music stored on the PC.
- This unit does not guarantee playback with all music player applications. Use the dedicated app "Technics Audio Player for Windows / Mac". For information of Technics Audio Player for Windows / Mac, refer to the following website.
www.technics.com/support/downloads/pc-app/index.html
Bluetooth®
Pairing cannot be completed.
- Check the Bluetooth® device condition.
The device cannot be connected.
- The pairing of the device was unsuccessful or the registration has been replaced. Try re-pairing the device.
- This unit might be connected to a different device. Disconnect the other device and try re-pairing the device.
The device is connected, but audio cannot be heard through this unit.
- For some built-in Bluetooth® devices, you have to set the audio output to "ST-C700D" manually. Read the operating instructions for the device for details.
NFC is not working.
- Make sure the NFC feature of the device are turned on.
- When you try again, change the angle at which the Bluetooth® device touches the NFC touch area.
- Turn on the NFC feature of this unit when you connect a device using NFC.
- Preparation
- Turn on the NFC feature of the device.
- Press [NWP].
- Press [> INPUT <] below [NWP] repeatedly to select "Bluetooth".
- Press [MENU].
- Press [ ][ ] repeatedly to select "NFC" and then press [OK].
- Press [ ][ ] to select "Yes" and then press [OK].
- Touch and hold your device on the NFC touch area of this unit within 20 seconds.
- Do not move the Bluetooth® device until it displays a message or reacts in some way.
Once the Bluetooth® device has reacted, move the device away from this unit.
– When the connection of the Bluetooth® device is complete, the name of the connected device is indicated on the display.
– The location of the NFC touch area differs depending on the device. When a connection cannot be established even if your Bluetooth® device has touched the NFC touch area of this unit, change the position of the device.
– The location of the NFC touch area differs depending on the device. When a connection cannot be established even if your Bluetooth® device has touched the NFC touch area of this unit, change the position of the device.
Playback does not start.
The sound is interrupted.
- Simultaneous use with other 2.4 GHz devices, such as microwaves, cordless telephones, etc., may result in connection interruptions.
Bring the Bluetooth® device closer to this unit and distance it from the other devices.
Radio
Reception is poor or a beat sound is heard.
- Keep the antenna away from computers, TVs, other cables and cords.
- Use an outdoor antenna.
MQA
How to play back MQA file or stream.
- Refer to the operating instructions "How to play back MQA file or stream". You can get the operating instructions from the following website.
www.technics.com/support/downloads/
The information of MQA files or streams cannot be displayed properly.
MQA files or streams cannot be decoded to deliver the master quality audio.
- Check to see if the current played source is MQA file or stream.
- If no information appears, press [INFO] several times to display it. The information of the MQA source file currently being played can be displayed on the unit. The sampling frequency displayed with the MQA authentication status is the original sampling frequency used in the mastering process.
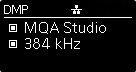
- MQA files or streams may not be decoded to deliver the master quality audio depending on the output setting of the device connected to digital audio input terminal (PC) of this unit. Refer to the operating instructions of the connected device or the music player application. (Please output MQA sound source without audio signal processing.)
Remote control
The remote control does not work properly.
- To avoid interference, please do not put any objects in front of signal sensor.
- Change the remote control code if other products react to this remote control.
- If the SU-C700/SL-C700 is selected for the device to be operated, press [NWP] and retry the operation.
Pressing [DIMMER] changes the display, the light and the indicator brightness of the SU-C700/SL-C700.
- [DIMMER] works for the SU-C700/SL-C700 as well as this unit. Turn off the device that you want to maintain the brightness level of, and press [DIMMER].
Messages
The following messages or service numbers may appear on the unit’s display.
"AUTO OFF"
- The unit has been left unused for about 20 minutes and will enter standby mode within a minute. Press any button to cancel it.
"Checking Device"
- The unit is checking the connected iPhone/iPad/iPod or a USB device.
"Connect to Network"
- Connect this unit to the network and then wait for the start of the Firmware Update via Internet.
"Connect USB Device"
- Download the latest firmware on the USB flash memory and connect it.
For details, refer to the following website.
www.technics.com/support/firmware/
"Download Fail"
- The firmware download has failed. Press any button to exit. Please try again later.
- The server cannot be found. Press any button to exit. Make sure that the network is connected to the internet.
"Empty"
- The selected folder is empty. Move tracks into the folder and retry the operation.
- The server is not found on the network. Check to see if the server is connected to the same network as this unit, and retry the connection to this unit.
- No Internet Radio station is registered to the favourite list. Add a station to the list.
"Error"
- Incorrect operation is performed. Read the instructions and try again.
"Firmware update is available"
- The firmware (free of charge) for this unit is available.
- Press [NWP].
- Press [OK].
- Press [ ], [ ] to select "Yes" and then press [OK].
- - The progress is displayed as "Updating □%" while updating. ( □ stands for a number.)
- - When the update has finished successfully, "Success" is displayed.
- After "Success" is displayed, disconnect the AC mains lead and then reconnect it after 3 minutes.
- For the update information, refer to the following website
www.technics.com/support/firmware/
"F□□" ("□" stands for a number.)
- There is a problem with this unit.
Is this unit placed in an extremely hot place? If so, move this unit to a cooler place and wait a few moments and then try to turn it on again.
If the problem persists, write down the displayed number, disconnect the AC mains lead and consult your dealer.
"Load Fail"
- The firmware on the USB flash memory cannot be found.
- Download the latest firmware on the USB flash memory and try again.
"Login Error"
- The connection to vTuner has failed.
- Confirm the network connection and settings.
- Select a different audio source and then select Internet Radio again.
"No Network Available"
- This unit is not connected to the network.
Check the network connection.
"No Memory"
- There are no preset DAB/DAB+ stations to select. Preset some channels.
"No Signal"
- This station cannot be received. Check your antenna.
"Not Valid"
- The function you have tried to use is not available with the current settings. Check the steps and settings.
"Operate via App"
- Operate via Technics Music App.
"PGM Full"
- The number of programmed tracks is more than 24.
"Please Wait"
- This is displayed, for example, when this unit is turned on/off. (For up to 1 minute and 30 seconds)
"Remote □" ("□" stands for a number.)
- The remote control and this unit are using different codes.
Change the code on the remote control.
- When "Remote 1" is displayed, press and hold [OK] and [1] for at least 4 seconds.
- When "Remote 2" is displayed, press and hold [OK] and [2] for at least 4 seconds.
"Remote Mode"
- Basic operations using any of the basic control switches on the main unit or the buttons on the remote control cannot be performed. (This happens when music stored on a DLNA server is played back on this unit (DMR), for example.)
- Use the connected device (smartphone, tablet, etc.) for basic playback control.
- If you want to operate from the main unit or the remote control (playing back music stored on the DLNA server with this unit (DMP), etc.), please switch the input source again from the main unit or the remote control.
"Scan Failed"
- Stations are not receivable. Check your antenna and try Auto scanning.
If "Scan Failed" is still displayed, find the best signal reception with the "Manual Scan" tuning function.
"Searching"
- The unit is checking the DLNA server on the network.
"Unlocked"
- "PC" is selected, but a PC is not connected. Check the connection with the PC.
- The sampling frequency components, etc. of the audio signals are not input correctly.
- About supported format, refer to "File format" (⇒ Operating Instructions)
"USB Over Current Error"
- The iPhone/iPad/iPod or USB device is drawing too much power. Disconnect the iPhone/iPad/iPod or USB device and turn the unit off and on again.
"Hub Device Not Supported/Device Not Recognized/Not Supported/USB Device Not Supported"
- You have connected an iPhone/iPad/iPod or USB device that is not supported.
- If the iPhone/iPad/iPod is compatible, turn it on and connect it correctly. - The format of the file on the iPhone/iPad/iPod or USB device is not supported.
- About supported format, refer to "File format" (⇒ Operating Instructions)
About Network service
The service contents may be changed or discontinued at the discretion of respective service providers without notice. Panasonic will assume no responsibility whatsoever for any damage or loss resulting from change or discontinuation of the service.